- Secure and timely shipping with UPS. National coverage ensures your products arrive wherever you are in the USA.
Cultivation Tips Outdoor Series
Starting Cannabis Seeds Outdoors: A Simple Guide
There are as many techniques growers use to start cannabis seeds, as there are varieties of seeds to start. Some are universal, the standard, while others are unique to their originated source. I will not attempt to sway anyone’s opinion or claim to have the “best” method. Rather, I will share with you, the simple, cost-effective method I’ve used successfully for over three decades, that’s always delivered good results.
There’s a lot of innovative products you can buy to make starting your cannabis seeds easier. I don’t use them. Many of these products weren’t widely available during prohibition. I managed then, as I do now. If it ain’t broke, don’t fix it. Besides there’s always something to spend money on when cultivating and I try to focus that spending in areas of HIGH return.
My simple seed starting kit consists of:
- Sandwich bags
- Paper towels
- 9 oz Solo cups / comparatively small pots.
- An OMRI certified organic starting mix.
- Living Organic Soil or Worm Castings
- Water
Watering Cannabis Seeds: Tips for Success
Many growers recommend using Distilled or RO (Reverse Osmosis) water and checking the EC (Electrical Conductivity) and pH (Suggested product link: Aero-Gro Water Meter). While all of the above are important to Hydroponic growers, we are growing in Living Organic Soil, so readily available tap water will work fine. Some tap water contains chlorine, which can kill beneficial bacteria in the soil. If your tap water contains chlorine or you’re not sure, simply leave your water sit in an open container for 24 hours, allowing the chlorine to evaporate, and it will be suitable for all your watering needs.
pH Considerations for Living Soil
Living Organic Soil is more tolerant than other growing media. Theoretically, if you’re doing an organic, water only grow, you shouldn’t have to pH anything. As long as it’s between 4.0-8.0, the Microbes do most of the work when it comes to managing pH in living soil. That said, I like a more definitive approach than “theoretically shouldn’t” . I pH my well water to 6.5 organically with Earth Juice Crystal pH down.
Step-by-Step Guide to Sprouting Cannabis Seeds
Now that we’ve discussed water, let’s get to sprouting our cannabis seeds.
- Wet your paper towel, fold it over and lightly squeeze out some of the water, leaving it a little more wet than damp but not saturated.
- Place your cannabis seeds on the wet paper towel and fold it over them, creating a few layers above and below your seeds. Leave some space between the seeds so they aren’t crowded and keep your strains separated in their own paper towels.
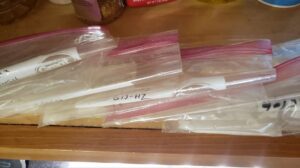
- Place your wet paper towels/seeds in a sandwich bag. Label the bag with the cultivar, date and number of seeds.
- Leave a corner of the bag open and fold it over.
- Place your bagged, labeled cannabis seeds in a dark, undisturbed location. Some growers use heat mats to speed up germination. I place my seeds in a cabinet that has an LED light strip attached to the underside. This slightly raises the temperature, accelerating germination, without any chance of overheating the seeds.
Preparing Your Seedling Pots
Now that your cannabis seeds are set to germinate, it’s time to prepare your cups. I prepare a cup for every seed I’ve set to sprout.
If you’re using Solo cups or similar containers, you will need to create drainage holes. I add holes to the bottom and the lowest point on the sides to ensure good drainage and aeration.
Adding uniformly open drainage holes can be easily accomplished by using a hot punch such as an Ice pick, nail, or rat tail file. Heat the point over a torch or other heat source and gently push your holes in place, quickly and easily.
After your drainage holes are in place, it’s time to fill your cups with a starting mix.
Creating the Ideal Soil Mix for Cannabis Seedlings
In the past, I have used 3 parts Pro-Mix to 1 part worm castings, with good results. Nowadays, I use 3 parts OMRI seed starting mix and 1 part Living Soil. This 3:1 ratio safely provides your cannabis seedlings with everything they need for a healthy, balanced start, without the risks of burning them.
Some may ask why I add nutrient-dense living soil to my starting mix for seedlings, as mother nature provides the seedling with all the nutrients needed for the first 7-10 days after germination. Living Soil is more than a source of nutrients.
The microbes in the soil regulate the phytohormones, encouraging healthy root development and the thousands of different species of bacteria, fungi and protozoa help the seedlings build tolerance against stresses and disease.
I want my seedlings off to a healthy, solid start. So to me, the question is, why wouldn’t I?
I like to mix my seed starting mix in a single large pot. Example: If you’re growing 8 plants, add 6 solo cups of starting mix, then add 2 solo cups of soil and blend. This will give you enough 3:1 mix to fill 8 prepared solo cups. I find it easier to lightly water the mix, in the big pot, prior to filling the cups. You want the starting soil evenly moist but not saturated. Rather than filling the cups to the brim, I like to leave a couple of inches of space at the top. (More on this later).
Sit your prepared, filled cups aside until your seeds have sprouted and are ready to plant.
Check your seeds every 24 hours, by gently unfolding the paper towel for observation.
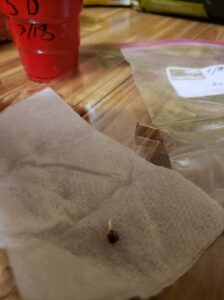
When the shells have split and the white sprout has emerged, it’s time to plant.
24 hours after placing our seeds in the paper towels, we have sprouts ready to plant!